|
|
Users Instructions ImagOn Ultra photopolymer films |
2. Lamination
Standard Lamination
- Cut filrn slightly larger then plate size
- Place degreased plate (with alcohol) on clean glass slab, or any other hard surface that does not absorb water.
- Spritz plate with water
-
|
The film consists of three layers: a transparant plastic layer ("mylar") on both sides of the film, and the actual photosensitive emulsion as a layer in between. The film comes on a roll, the inner layer is the one at the inside of the "curl" |
|
 Remove inside peel-back layer (inside of film curl) from the ImagOn Ultra. This can be done by prying off the inner layer, but the easiest way is probably as shown in the image; a piece of double-sides tape on a table corner. A corner of the film sticks to the tape and with some training the inner layer be relaesed from the film. Remove inside peel-back layer (inside of film curl) from the ImagOn Ultra. This can be done by prying off the inner layer, but the easiest way is probably as shown in the image; a piece of double-sides tape on a table corner. A corner of the film sticks to the tape and with some training the inner layer be relaesed from the film.
|
- Place film (mylar on top) flat on plate by gently laying it down from one end of the plate. If bubbles appear under film lift one comer of the film and lay it back down.
- Spritz top of film generously with water
-
|
Gently and quickly squeegee the film from the center outwards, until the film is smooth. Repeat with increasing pressure until all water and air bubbles are no longer visible |

|
- Sponge dry the surface from the center out, rub harder where Imagon is not sticking thoroughly, pay special attention to the edges.
-
|
While still on the glass slab trim the excess film from the edges of the plate |

|
-
|
Bond the film to the plate using a drying cabinet (5 minutes at appr. 50° C) or a hair dryer on the backside of the plate, set on high for about one minute per sq.ft area. (1 square foot = 30x30cm) |

|
- The laminated plate is now ready for image exposure with the UV exposure unit
Plates targer than 9 + 12
- Do steps 1-4 of Standard Lamination
- Spritz the plate and the emulsion side of the ImagOn Ultra with water, thoroughly saturate
- Place film on plate, careful to avoid folds, if folds do appear lift film and place down again, until it naturally lays flat, if it sticks prematurely add a few drops of liquid soap to the lamination water or follow instructions for Large plates
- Finish as you would with a standard lamination continuing from step #6
-
|
Bond the film to the plate using a drying cabinet (5 minutes at appr. 50°C) or a hair dryer, set on high for about one minute per square foot |
|
- The laminated plate is now ready for image exposure
WET LAMINATION for Lamination Large Plates or more than TWO Layers of ImagOn for the Layered Intaglio-Type Method
The Wet Lamination method should always be used for applying more than one layer of Imagon to a plate. Be careful to remove the Mylar layer, on top of the Imagon film, between each layer
- Place plate in a developing tray under 1/2 inch of plain water
-
|
Remove inside peel-back layer (inside of film curl) from the ImagOn Ultra. This can be done by prying off the inner layer, but the easiest way is probably as shown in the image; a piece of double-sides tape on a table corner. A corner of the film sticks to the tape and with some training the inner layer be relaesed from the film. |
|
-
|
Place film, emulsion side down, in water above the plate; The film will float on top of the water |

|
- Remove film and plate together from water so that the film stays on top of the plate. Grasp the edge and under the plate while bringing the plate out of the water. Avoid grasping the plate and Imagon film together when removing it from the water. Wherever you do this the Imagon will stick prematurely thus not allowing for re-positioning of the film.
- Place the plate with ImagOn floating on it on to a glass slab. There will be a thin layer of water between the film and the plate.
-
|
Quickly, gently and carefully squeegee the film onto the plate starting in the center and working out, being careful not to push too hard and wrinkle the film. It will want to stretch and wrinkle. Slowly increase the pressure and repeat. Use a 6" squeegee with sharp medium neoprene rubber blade. Repeat with increasing pressure until all water and air bubbles are no longer visible |
|
-
|
Finish as you would with a standard lamination. Bond the film to the plate using a hair dryer, set on high, or a drying cabinet. Drying time will be about 2 minutes per square foot or use a hot plate set hot enough not to inflict a burn. Cover the ImagOn plate with aluminum foil to avoid exposing it to stray room light |
|
The laminated plate is now ready for image exposure
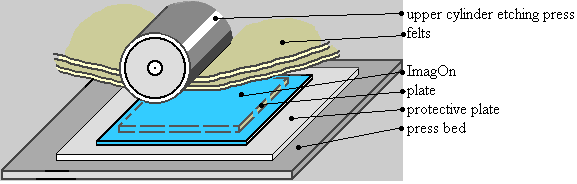
Lamination with an etching press
Keith Howard described how to use an etching press for lamination purposes in his book "Non-toxic Intaglio Printmaking". Lamination can be done in various ways. The right way to do it depends upon the sort of film and for example the humidity. In dry area's it is important to use much water during lamination. Try the different techniques and choose the best one.
- Cut filrn slightly larger then plate size
- Place degreased plate (with alcohol) on clean glass slab, or any other hard surface that does not absorb water.
- Spritz plate with water
-
|
The film consists of three layers: a transparant plastic layer ("mylar") on both sides of the film, and the actual photosensitive emulsion as a layer in between. The film comes on a roll, the inner layer is the one at the inside of the "curl" |
|
Remove inside peel-back layer (inside of film curl) from the ImagOn Ultra. This can be done by prying off the inner layer, but the easiest way is probably as shown in the image; a piece of double-sides tape on a table corner. A corner of the film sticks to the tape and with some training the inner layer be relaesed from the film. |
-
|
Spritz the plate with water. Lay the film (mylar on top) gently on top of the plate. Be careful not to wrinkle the film. Use normal pressure for the press et let the plate run through the press. |
|
-
|
Put the plate on the work table and trim the excess film from the edges of the plate |
|
-
|
Bond the film to the plate using a drying cabinet (5 minutes at appr. 50° C) or a hair dryer on the backside of the plate, set on high for about one minute per sq.ft area. (1 square foot = 30x30cm) |
|
- The laminated plate is now ready for image exposure with the UV exposure unit
|