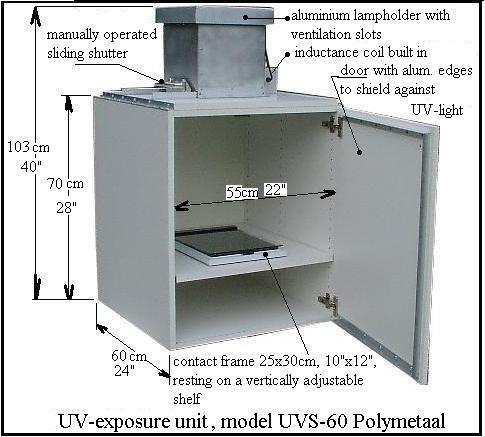
User's instructions exposure unit UVS-60,
Polymetaal
General information about photopolymer.
An Ultra Violet exposure unit is used to expose a light sensitive
emulsion to Ultra Violet light. This particular emulsion is a
photopolymer. A photopolymer is a plastic of which some properties
change if exposed to light. An unexposed emulsion consists of
"monomer" molecules without much cohesion. As soon as these monomers
are exposed to light, they change into polymers which means that the
molucules form links and chains with other molecules. A "monomer"
molecule can be washed out easily with with a water/soda solution,
while a "polymer" molecule appears to us as "hardened out" because of
the links and chains it forms with other molecules, hence it cannot
be washed out to easily with a water/soda solution.
The light sensitive emulsion can be applied to a plate in various
ways;
- A liquid emulsion can be applied to a plate with an aerosol
spray or with a brush. Another way is the use of a turntable; a
drop of liquid is dropped on to the middle of the plate on the
turntable. The centrifugal forces will distribute the liquid
evenly over the plate. In this manner a very thin and even layer
kan be accomplished.
- The light sensitive emulsion is also available as a film, on a
roll. The sensitive layer is very fragile and is therefore
protected on both sides with a transparant mylar layer. This film
can be applied to the plate in different ways. (see instructions
for ImagOn, ImagOn Ultra, Riston and Puretch).
- Also available are plates with a ready made layer of
photopolymer on top (Toray, Solar plates). These plates are used
in commercial (relief)printing as an alternative for the old lead
clichés. Because of the thickness of the layer (appr.
0,5mm) these plates mainly used for relief printing. (Dianne
Longley's "Printmaking with Photopolymer Plates" or Dan Welden's
book "Printmaking in the Sun").
The sort of material to be used for the support of the polymer
plate depends upon the final purpose. It is obvious that the support
must be able to resist the pressure of an etching press. This already
limits the choise to metal and some plastics. The "Toray plates" or
"Solar plates" for example have a support made of a steel sheet of a
few tenth's of a mm thickness.
- If a film can be laminated onto a plate, it is very important
to realize this this allows the plate to be handled and printed
like any other intaglio plate. Photopolymer films come in
several thicknesses; For example the ImagOn (Ultra) films are
about 50 microns (0,05mm) thick. This thickness makes these films
very suitable for the "Non-etch-techniques".
In a "non-etch-technique" the film is exposed in the contact frame
through a transparant sheet of plastic that carries the image. In
the next step the polymer is washed out in a water/soda solution.
The unexposed areas in will be washed out and show up as grooves
in the film. The exposed areas will not be washed out and remain
intact. After drying the plate in a drying cabinet the plate can
be inked and printed. After inking and wiping the "grooves" only
contain ink, the same way as in "traditional" intaglio. The
difference here is that the grooves are only present in the layer
of photopolymer and not in the metal plate beneath it. The metal
plate is therefore used only as support in order to keep the film
and hence the image together.
- If the emulsion is applied on to the plate as a liquid, this
results normally in a very thin layer. (5-20 micron). Some
photopolymer films are also quite thin (Puretch or Blue Shot). If
one uses these thin layers of film for a "non-etch-technique"
there will be a problem when printing a dark black. The film is
not thick enough to contain, when etched, enough ink in order to
print a dark black. These thin layers are not to be used for
non-etching-techniques. They are however very suitable for
"etching-techniques". In these techniques the polymer is used as a
resist. The preparation and exposure are more or less the same as
with a "non-etch-technique" but the development times in the soda
bath are longer. The unexposed area's are completely washed off
from the plate. The exposed areas are hard and will remain intact.
Next the plate is etched (in iron-per-chloride, ferric-chloride).
The grooves and dots will not be created in the film, but in the
copper or zinc plate. After etching the plate is cleaned in a more
concentrated bath of water and soda. In this bath also the
hardened polymer will also dissolve after about 10 minutes. The
plate can now be inked and printed in the normal way. This
technique also allows you to add to the plate other techniques
like dry point or engraving. In the "etch-techniques" the support
of the film becomes the forme to print from.
Use of the UV exposure unit
- Use the exposure unit only in areas where direct daylight has
no access. Daylight contains UV-light and can influence the
photopolymer. Low intensity normal tube light is no problem.
- Insert the plug into the mains. The UV-light will start, but
first with a low intensity. After a few minutes full intensity is
reached. Therefore, the lamp should be kept on during a session.
The sliding shutter must be used to start and stop the
exposure.
- Open the glass cover of the contact frame (or vacuum-frame).
Place the plate in the contact frame with the sensitive layer
pointing upwards.
- The transparant plastic sheet carrying the image is put on top
of the plate with the image side pointing downwards. Close now the
contact frame. It is very important that there is no space between
the image on the sheet and the light sensitive layer. If there is
space, it will probably lead to a fuzzy print.
- Record the time. Decide when the shutter must be opened and
closed. The exposure time depends upon many things but will
probably be around 2 or 3 minutes. Carry out the exposure.
- After exposure the contact frame is openened and the plate is
taken out. The image can be seen vaguely on the film
(ghost-image). The plate is now ready to be developed in the soda
solution.
Points of attention:
- At this time only the contact frame of 25x30cm (10"x12") is
available and comes with the exposure unit. For some printmakers
this size is good enough, especially while learning to work with
these techniques. For others however, bigger sizes are needed.
Polymetaal will develop in the future a contact frame of 50x60cm.
It is possible that it will have to become a vacuumframe. Check
this page regularly to find out recent developments.
- The distance between the contact frame and the lamp is
adjustable; therefore the smaller the print the shorter the
distance as well as a shorter the exposure time. If one needs the
full size of 50x60cm, the contact frame must be in the lowest
position.
Use the "back-button" to return to
the previous page.