User's instructions, Polymetaal
etching presses JPVEV series (JPVEV-70, JPVEV-80,
JPVEV-90),
and JWEV-series (JWEV-80, JWEV-100, JWEV-120) electric
etching presses with continuously variable printing
speed.
Unpacking
The press is fixed to a wooden pallet and is packed and
rapped in cardboard and plastic foil. Take this packing
material from the press and take the screws out that fix the
machine on the pallet. The machine should now be lifted to
be able to take the pallet out. The two shafts between the
side frames and positioned above the top roller, are strong
enough to carry the weight during this process. Keep safety
features in mind.
You should clean the rollers first. For safety reasons these
rollers are packed with grease paper and plastic tape. Make
a very small cut in the plastic tape which allows you to
peal off this material. The rollers must be cleaned from
grease with a solvent . The rollers must be clean and dry
before use. It is advisable however to check the four
guides, fixed on top of the side frames, that keep the bed
plate in place.
Also the steel bars between the side frames that carry the
plastic rollers might be adjusted. For this purpose this
drawing is shown;

The four bed guides can be
shifted sideways, which changes the open space between the
guide and the bed. This space should be approximately 1 or 2
mm. (Play "A"). It is important that all the bed guides are
in line and have about the same play. These guides can be
secured with the hexagon bolts.
The position of the round bars with plastic rollers can be
changed vertically. With an "Allen key" the screw with
inside hexagonal can be untightened which allows the change
of position. The plastic rollers should alway have a certain
play between the bed (Play "B"). Because of the presence of
this space it is always certain the the bed is in full
contact with the lower roller, which minimizes slippage.
It is possible that the
power cord (electric cable) is not fitted with the right
electric plug. Almost every country uses a different system,
so it is wiser to leave this up to the local qualified
electricians. The mushroom shaped safety stop can either be
fixed to the floor or somewhere else. It should be fixed in
such a way that it is easy to operate in case of an
emergency.
Assembly and disassembly
of these machines.
We recommand not to do the
assembly/disassembly yourself. The electric and mechanical
system makes is even more complicated than the manual
versions of these presses. However if you are enough
qualified for this sort of work, it is possible. You can
start reading the instructions
that are valid for the manual JPV
press or
instructions
that are valid for the manual JW
press and just
add the electro-mechanical components. If you are in doubt
about an electrical connection you can find help in the
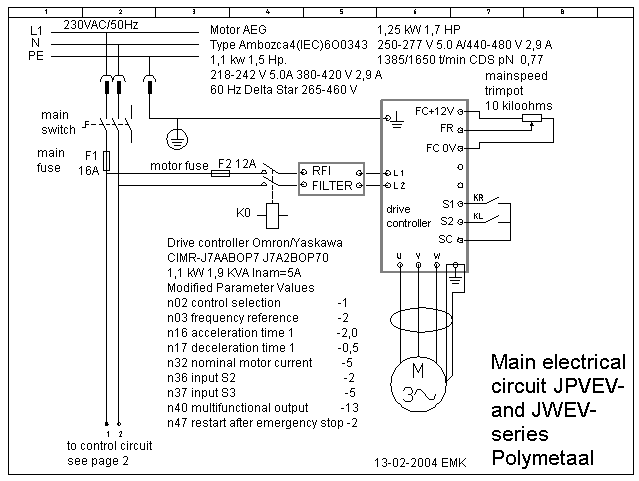
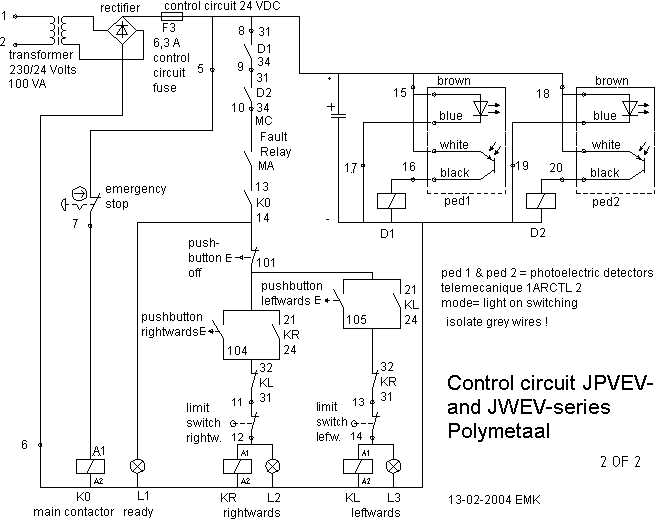
electric wiring scheme's here below.
Instructions to operate
the machine
This machine should be
connected to a 220-250 V AC outlet with PE (earth)
connection to avoid electrical shock. Any alterations in the
electrical circuit or the program of the inverter should be
performed by qualified electricians.
Starting the machine:
1. Connect the plug to a 220 VAC outlet.
2. Put the "main switch" into the "on" position
(vertical)
3. Now two leds (little lamps; yellow and red) on both
photo-electric detectors must be lit. These detectors
are situated on each side of the top cylinder, near the
metal box that contains the drive system. If the detectors
do not show the yellow and red, they are not
correctly aligned or there is something in between the
detector and the reflector. Adjust the alignment!
(vibrations during transport can easily cause an adjustment
error) The location of the detectors can also be changed
vertically. If you are printing from woodcuts it might be
necessary the fix the dectors a bit higher. If anything
interferes with the light-beam from these detectors, the
machine will stop automaticly.
4. Test the pushbutton rightwards, stop (red 0), and
pushbutton leftwards. The lower roll should move the plate
in the right directions.
5. Adjust the speed by turning the trimpot on the side of
the cabinet.
Stopping the
machine:
This machine is equipped
with two stop citcuits:
A. An emergency stop circuit., acitivated by the
separate emergency stop switch (mushroom type).
This stop circuit should only be used in case of emergency.
Resetting the system: Turn the main switch in "OFF"
position, wait for appr. 40 seconds, switch on and
start.
B. A functional start/stop circuit, consisting
of:
- The pushbutton "OFF"
(red)
- the photo-electric
detectors
- fault indication relay
of the inverter
Note: 2 limit switches are fitted to ensure the motor
will stop when the end of the bed reaches the lower
roll.
Safety systems; see
also "stopping the machine".
It is absolutely essential that only one person operates
the press at a time.
Other persons should keep safe distance from the moving
bedplate.
The operator should not move away from the operating panel
while the press is in motion.
Fuses:
There are three fuses in the side panel of the cabinet, just
beneath the main switch, all preferably ceramic 6x32mm. The
left one is the main fuse: 16 Amp., Middle one, motor fuse
10 amps. The right one is the control circuit fuse: 6,3
Amp.
Drawings & Parts
List
Parts of this manual are 2 electrical drawings:
1. Main electrical circuit JPVEV-series, and the
JWEV-series.
2. Control circuit
JPVEV-series, and JWEV-series
Standards and
Regulations;
The manufacturer of these products declares that the
equipment complies to the European standard IEC 335-1
"Safety of household and similar electrical appliances"- and
that this equipment was produced according to CE-Standards
(Machineguidelines and Magnetic Compability)-and that the
CE-label has been attached to this equipment.
Use of the press
This press is very well suitable for printing intaglio
(copper and zinc plates) as well as woodcuts and
linocuts.
The following drawing shows the situation while printing
from an etched or engraved metal plate.
(intaglio)

The purpose of the felt is
to press the paper into the small engraved lines of the
plate, in order to accept ink.
Some people use cardboard shims under the pressure spindle
(between the small moveable part and the bearing block of
the top roller) to generate more "flexibility" in the press.
For etching is has not much effect, but for printing
woodcuts or linocuts it can be of help. It helps to
compensate the irregularities of the wood's surface.
Printing woodcuts and
linocuts with this press

The drawing shows a layer of
felt. This felt has also the feature to compensate for
irregularities of the woodcut or linocut. (differences in
thickness). If the woud or lino should be perfectly plane,
no felt was needed. Underneath the felt is a plastic layer
(PVC) of appr. 5mm thick. This is only functional in
combination with the felt. If the PVC layer should not be
used, the felt would press the paper into the hollows of the
woodcut or linocut. If you want embossing, very well. If
not, prevent this from happening by using the plastic layer.
Maintenance
- The bearings of this do
press not need lubrication. (all ball
bearings)
- All clean steel surfaces
have been threated with a protective spray (Tectyl) to
prevent rusting, with the exception of the rollers. (felt
would attract dust if in contact with this
spray)
- It is recommanded to use
and store this press in a dry room, to prevent rusting.
(For example, etching with aggressive agents should be
done in a different room, for the same
reason)
- The lectric system, as
well as the gearing systems, do not need maintenance.
These systems are designed to work in industrial
environments.
- The light detecting
system is sensible to dust. Clean the glasses of the
detectors on a regular basis, as well as the
reflectors.
Use the
"back-button" to go back to the JPVEV-series, or JWEV-series
pages.
|